

Walkthrough for Atlas Fallen is a detailed step-by-step guide that takes players through the main campaign and each of the available quests that are featured in Atlas Fallen. This will cover vital information to ease each player's progress, help with completing tasks and will help with locating key items as players explore each location. This walkthrough can be followed from the start of the game till completion and can be followed in the same order of the main campaign. This walkthrough will highlight all important items, gear, and special encounters that can be found during the game.
Atlas Fallen Review
Atlas Fallen Helpful Links
- Game Progress Route: A streamlined to-do list by Location
- Endings: Learn about the game's Endings.
- New Game Plus: Learn about continued playthroughs.
- Enemies: Learn all about your main opponents that will encountered throughout the game
- Bosses: View guides on each boss encounter
- Locations: Navigate through each area and identity the important points of interests and key items in each region
Atlas Fallen Walkthrough Guide
Navigate Walkthrough Guide for Atlas Fallen by Region
Navigation
Click on the links below to visit the page:
Caladrias Region Walkthrough

General Info
- Region: Caladrias
- Location: Tithe Caravan
- Starting NPC: Tracker
- Previous: n/a
- Next: Away From the Sun's Eye
Rewards
All Quests in Tithe Caravan
Main Quests:
Side Quests:
- n/a
Errands:
- n/a
NPCs
NPCs:
- Tracker
- Warden
- Smith
- Herder
- Morrath
- Grave Digger
- Cook
Merchants:
Bosses
- n/a
Items
Fusion Materials:
Formulas:
- n/a
Treasure Maps:
- n/a
Tithe Caravan Lore Items (8):
- The Caravan
- Report: Aftermath of the attack
- Report: Unruly Unnamed
- Report: Preparing to move out
- What Remains
- Morrath (Lore Item)
- To my Mentor
- State of the Caravan
Tithe Caravan Quest Items:
Enemies
Prologue Walkthrough Guide
The Essence Caravan Description
After surviving the wilderness, you discovered that the caravan has set up camp. You're an Unnamed assigned to work in the. lower camp. Your friend Tracker and you want to improve the situation for all Unnamed. Find other Unnamed willing to help.
The Essence Caravan Objectives
- Talk to Warden, Smith. and Herder 0/3
- Talk to Tracker
- Go after Morrath
- Search the wilderness
- Find the thief
- Find the source of whispering
- Defeat the wraiths
- Find a way out of the pit
- Defeat the wraiths
- Climb up the rock wall
- Find the thief
- Return to camp
- Learn where Morrath went
- Reach the northern exit
- Find an armour to leave the camp
- Find Morrath
- Defeat the wraith
- Find the exit of the cave
- Escape from the cave
The Essence Caravan Walkthrough
Talk to Warden, Smith, and Herder 0/3
This Quest begins at the Lower Camp of the Tithe Caravans. Your 3 NPC objectives will be marked in yellow on the navigation bar at the top of the screen. Follow each marker to the NPC and interact with each one. You will need to speak with three NPCs in the area:
- Warden
- Smith
- Herder
Talk to Tracker
After speaking with all 3 NPCs, return to Tracker and speak to her by the Campfire. Select the first dialogue option to say you will rally them to progress to the next objective.
Go after Morrath
This objective appears during the dialogue and will be completed at the end of the sequence.
Search the wilderness
Find the thief
After your interaction with Morrath, you will be released in the Wilderness where a voice will eventually call out to you as you move towards your new objective marker.
Find the source of whispering
While looking for the thief, you faintly hear a voice call out to you. Find out where it is coming from.
Continue to follow the yellow objective on the navigation bar. It should take you east till you reach a source of light. Jump down to the lower level towards the voice and a cutscene will begin.

Defeat the wraiths
You have obtained the Gauntlet. This is where you will begin your first Combat trial against a few level 1 wraith Enemies. Clear the wraith to continue using the Combat instruction tutorials that appear on the screen.
Find a way out of the pit
You barely survived the fight against the strange beast. But the gauntlet you found seems to have granted you superhuman powers. Find a way out of the pit.
Your objective marker will be updated and it will lead you south. You will eventually gain a tutorial on the momentum before another Combat interaction
Defeat the wraiths
Clear the wraiths in the area. There will be more wraiths this time.
Climb up the rock wall
The quest will lead you to the next location and will teach you how to double jump. Climb up the nearby rock wall to continue.
Find the thief
The powerful gauntlet has granted you the means to fight wraiths and greatly enhanced your abilities. Explore the wilderness and look for the thief you saw earlier.
Once you have climbed the wall, you can return to looking for the thief. You may encounter a few more enemies as you explore the area. Follow the marker that will lead you West. You will eventually find the thief standing at the edge of the cliff. Interact with him to continue. Ask him for what he stole to progress in the quest.

Return to camp
You found the thief and retrieved Morrath's momento: An Old Insigna. Return to the camp and tell Morrath what happened. With the Old Insignia in hand and your newfound powers, you might be able to improve conditions for all Unnamed.
Return to camp with the Old Insignia to begin the next cutscene.
Learn where Morrath went
Upon your return to camp, Morrath took the gauntlet for himself! Find out where he went and reclaim the. gauntlet! This might be a way to change things.
Speak to Tracker to learn about the Gauntlet, then speak to the nearby Caravan Guard just north. He will then move out of the way and allow you to enter the Upper Camp.
Reach the northern exit
Explore the area to find a few Lore Items and a Merchant. Go past the tens and there will be a Grave Digger you can speak to and ask about Morrath.
Find an armour to leave the camp
Speak to the Travelling Vendor at the Upper Camp and purchase the Recruit Garments from him to complete the objective.

Equip the armour and leave the camp
Go into your Armour menu to equip your newly purchased armour. You request objective will update and will lead you to the exit of the camp north of where the vendor is. Speak with the Caravan Guard.
Find Morrath
Nyaal will start speaking to you. Follow the objective marker and it will lead you through the path into a cave. Continue looking for Morrath through the cave until you reach a lit area where a cutscene will begin.
Defeat the wraith
This time you will be engaging in combat against a Cloaker, a powerful wraith. Learn how to use your Sandskin to parry the Cloaker's attacks and maximize your attack openings. Clear the Cloaker to gain access to the Sandwhip.

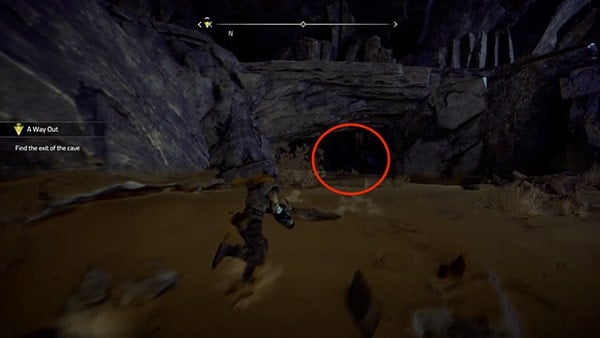
Find the exit of the cave
Follow the quest marker to reach the exit of the cave.
Escape from the cave
Head towards the cave exit. Once you reach the exit of the cave, the quest will be completed.
The Essence Caravan Quest Complete Description
You escaped alive, but the Watcher destroyed the camp and sent you sliding down the sandy slopes. Will you get back to civilization?
Video
[video goes here]
The Essence Caravan Trivia & Notes:
Trivia and notes go here
General Info
- Region: Caladrias
- Location: Sandy Ravine
- Starting NPC: The Voice
- Previous: The Essence Caravan
- Next: A Way Out
Rewards
- n/a
Enemies
Sandy Ravine Walkthrough Guide
Away from the Sun's Eye Atlas Fallen Description
You barely escaped Morrath who was engulfed by otherworldly flames. The Watcher destroyed the camp and is approaching. Escape through the ravine ahead.
Away from the Sun's Eye Atlas Fallen Objectives
- Escape the Watcher
- Explore the Cave
Away from the Sun's Eye Walkthrough
Escape the Watcher
Sandglind through the cave tunnel and then continue to navigate while trying to remain in the middle of the path, until you drop down.

Explore the cave
You escaped the Watcher's destruction and landed in a cave somewhere. Nyaal can sense a settlement further ahead and a powerful object in your vicinity. Search the cave for that object.
This will soon transition to ht next section of the quest: A Way Out
Away from the Sun's Eye Quest Complete Description
You escaped the Watcher's destruction and landed in a cave somewhere. Nyaal can sense a settlement further ahead and a powerful object in your vicinity. Search the cave for that object.
General Info
- Region: Caladrias
- Location: Cave
- Starting NPC: The Voice
- Previous: Away From the Sun's Eye
- Next: The Lost Anvils
Rewards
NPCs
NPCs:
- The Voice
Merchants:
- n/a
Bosses
- n/a
Items
Equipment:
Fusion Materials:
Formulas:
- n/a
Artefacts:
Treasure Maps:
- n/a
Lore Items:
- n/a
Quest Items:
- n/a
Enemies
Cave Walkthrough Guide
A Way Out Atlas Fallen Description
You escaped the Watcher's destruction and landed in a cave somewhere. Nyaal can sense a settlement further ahead and a powerful object in your vicinity. Search the cave for that object.
A Way Out Atlas Fallen Objectives
- Explore the Cave
- Investigate the Object
- Find the exit of the cave
A Way Out Walkthrough
Explore the Cave
This quest begins in a cave in an Old Hideout in the Forbidden Lands. Head further into the cave until you encounter your first Anvil. It will be a glowing metal object and Nyaal will point it out.

Investigate the Object
Approach it and you will be prompted to Raise it.
Find the exit of the cave
the voice granted you the power to raise objects from the sand. Use it to find a way out of the caves.
After raising your first Anvil, you can not continue through the cave. There will be a platform directly behind that you can now Raise. You can now use your raised platform to reach the higher passage. Since this area slopes down, you can now Sand Slide down the slopes to quickly descend. You will eventually run into your first Essence Stone: Lost Temper. You will then have to engage in Combat against a Cloaker. A few Combat tips will appear. Clear the Cloaker and then continue sliding down through the cave. You may encounter a few other Enemies in the area. Check the corner of the cliff for Artefacts. You should be able to find a Replacement Limb (Special).
Continue toward the yellow objective marker on your Compass. Once you reach a cliff drop-off that leads to what looks like a dead end, there will be chest tucked away in the corner away from the cliff.
This will contain Preserved Spices (Rare). When you are done with the lower area, climb back up. You will need to cross over the thin connecting area of rocks that form a bridge which will be directly above where the chest was.

On ce you get across, there will be another chest by the wall. Open it to obtain Thick Skin. Continue toward the west and hop up the rock platforms till reach another raisable object. Raise it and use it to reach the next higher area. Nyaal will mention another Essence Stone nearby which will be in the open chest on the wooden platform at the corner. You will gain Hurling Hammer. You will get a chance to use your first active stone in the coming Combat encounter against a few Wraith Enemies.
After you have cleared the area, you can return to the same wooden platform with the open chest and raise it to ascend to the upper platform. This will lead to another tunnel and you will be near the surface. Follow through all the way out until you reach Caldrias Desert Passage. You will then have a Quest update and begin The Lost Anvils.
Video
[video goes here]
A Way Out Trivia & Notes:
- Trivia and notes go here

General Info
- Region: Caladrias: Forbidden Lands
- Location: Caladrias Desert Passage
- Starting NPC: The Voice
- Previous: A Way Out
- Next: The Path to Bastengar
Rewards
All Quests in Caladrias
Caladrias Main Quests:
Caladrias Side Quests:
Caladrias Errands:
NPCs
NPCs:
Merchants:
Items
Idols:
Fusion Materials:
- View all Fusion Materials
Caladrias Formulas (15):
- Active Formula I
- Active Formula II
- Active Formula III
- Active Formula IV
- Active Formula V
- Formula I
- Formula II
- Formula III
- Formula IV
- Formula V
- Formula VI
- Formula VII
- Formula VIII
- Formula IX
- Formula X
Caladrias Treasure Maps (3):
- The Great View
- Dead and Buried
- A Hole in the Desert
Caladrias Lore Items:
- Before they were forbidden
- Knights of Bastengar
- Outcast Knights
- Survival of the few
- The Old Mine
- Treasure Maps (Lore Item)
- Aftermath of the Battle
- What are the Shards in the Sand
- The Sealing Totems
- Quickfeet's Journal
- So Close
- Desert Adventure
- Report
- The Watchtowers
- I see him
- Where to Start...
- Bloodbath
- The Shattered Keep
- Old Memory
Quest Items:
- tba
Enemies
- Wraiths
- Mawer
- Cloaker
- Gazer
- Stinger
- Diver
- Shellbasher
- Tailguarder
- Marauder
- Heaver
- Scrimmur
- Gashur
- Coylur
Caladrias Activities
- Wildlife Habitats x4
- Treasure Map Locations x6
- Sealing Totems x7
- Watchtower x1
Caladrias Landmarks
- Anvils x12
- Vantage Points x5
- Sand Echoes x3
Caladrias: Forbidden Lands Walkthrough Guide
The Lost Anvils Atlas Fallen Description
You managed to exit the cave. Nyaal can sense another of those anvils in the nearby ruins. Find it to gain access to even more powers.
The Lost Anvils Atlas Fallen Objectives
- Raise the Anvil
- Awaken the anvil
- Find a piece to stabilise the gauntlet
The Lost Anvils Walkthrough
Raise the Anvil
Sand slide down the slope west until you reach a glowing area in the sand and interact with it to raise the chest.
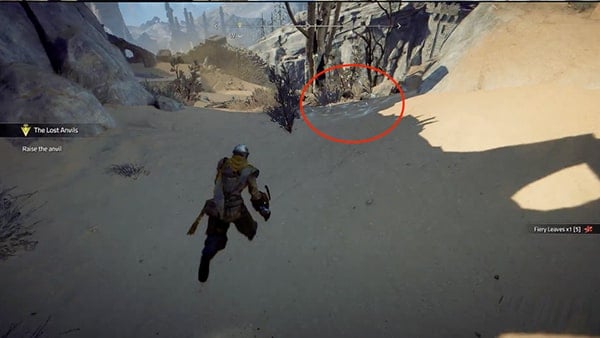
This will contain 150 Tributes. Continue west and drop down to the lower part of the sand and raise the platform below. Continue following the objective marked on the compass bar. You will reach a toppled tower.

Make your way to the top of the tower and you can collect another Artefact at the corner: Writing Tool (Common). Continue exploring the area. Just ahead of the objective will be another glowing spot and a chest to loot where you can loot: Idol's Fortune. Raise the ground to find the Anvil.

Awaken the anvil
Interact with the now-raised anvil. This will activate some dialogue. Allow it to play out till the next objective.
Find a piece to stabilise the gauntlet
The anvil let you see a glimpse of the past. Nyaal remembered another of their power. You can now cross larger distances by dashing through the air. Find out more about Nyaal and the gauntlet.
Your objective maker will update and it will lead you Northeast. You will be met with a few Stinger Enemies where you can practice your newly learned Air Dash. Clear the Stinger wraiths to continue.

Up ahead will be a chasm that you can now cross with air dash. Double Jump then Airdash to gain more distance. You will reach another downward slope and Nyaal's voice will start to break up. Descend further to trigger the next cutscene where you will meet Arif. The quest will update after your encounter and you will continue your journey to find a place to stabilise the gauntlet in the next section: The Path to Bastengar.

The Lost Anvils Quest Complete Description
n/a
Video
[video goes here]
The Lost Anvils Trivia & Notes:
Trivia and notes go here
General Info
- Region: Caladrias: Forbidden Lands
- Location: Caladrias Desert Passage
- Starting NPC: Mapmaker (Arif)
- Previous: The Lost Anvils
- Next: From Beliefs to Trust
Rewards
The Path to Bastengar Walkthrough Guide
The Path to Bastengar Atlas Fallen Description
You raised the Knights Statues. They seem to have been an old entrance to the stronghold of the Knights of Bastengar. You, Arif, and the villagers of Castrum VII journeyed through, to find what is left of the Knights.
The Path to Bastengar Atlas Fallen Objectives
- Find a piece to stabilise the gauntlet
- Complete: Reforging the Gauntlet
- Meet Arif in Castrum VII
- Retrieve the piece in the ruins
- Complete: Reforging the Gauntlet Part 2: Unearth
- Speak to Arif
- Raise the village's gate
- Defeat the Marauder
- Unearth the Knights' Gate
The Path to Bastengar Walkthrough
Find a piece to stabilise the gauntlet
This quest begins directly after The Lost Anvils. Align yourself with the yellow objective marker on your compass bar and head in that direction. You can explore the area on the way. This will eventually lead you to the Caladrias Ruins.

Approach the glowing piece in the middle of the ruins and you will trigger a cutscene. which will be followed by a combat sequence against a few wraith Enemies. Clear out the first wave of wraiths and you will be introduced to the Shatter ability. A Mawer and a few more wraiths will appear so you can try to use Shatter on them. Clear out the second wave of wraiths to continue. After clearing the area, you will be able to pick up the Enhanced Dash Piece and then you will be able to activate Nyaal's Senses.

This will also activate another Main Quest: Reforging the Gauntlet. You will need to advance this quest to proceed with the next objective.
You found a piece of the gauntlet that will help you stabilize it. You should meet Arif in the nearby settlement once the gauntlet has been reforged to plan the next steps.
The Path to Bastengar Quest Complete Description
You raised the Knights Statues. They seem to have been an old entrance to the stronghold of the Knights of Bastengar. You, Arif, and the villagers of Castrum VII journeyed through, to find what is left of the Knights.
General Info
- Region: Caladrias: Forbidden Lands
- Location: Caladrias Desert Passage
- Starting NPC: The Voice
- Previous: The Path to Bastengar
- Next:The Path to Bastengar
Rewards
- Enhanced Air Dash
Items
- Enhanced Dash Shard x3
Reforging the Gauntlet Walkthrough Guide
Reforging the Gauntlet Atlas Fallen Description
You found the artefact that Nyaal sensed, but it needs more parts to be upgradeable. Collect enough shards to reforge the gauntlet's Air Dash capabilities. Remember to use Nyaal's senses to find the shards around you.
Reforging the Gauntlet Atlas Fallen Objectives
- Find Enhanced Dash Shards (3)
- Upgrade your Air Dash at an anvil
Reforging the Gauntlet Walkthrough
Find Enhanced Dash Shards (3)
This quest begins during The Path to Bastengar after obtaining the Enhanced Dash Piece. Use Nyaal's Senses to help lead you to the next dash shards required for this objective. While atop these ruins, face west to see an extended plank platform. You will be able to dash across to the other side where there will be a Scouting Villager you can briefly interact with and a chest that will contain Active Formula V. From here, face north and take the long rope bridge across to reach the Outskirts.
There will be another chest nearby a stone wall which will contain Formula IX. Turn the corner from the chest and there will be another buried chest you can raise and loot nearby which will contain Tributes.
Enhanced Dash Shards #1
- Location: Outskirsts Castrum VII
As you continue to explore the outskirts, you can regularly activate Nyaal's Senses to reposition yourself and continue heading toward the beams of light that appear when they are activated.

A chest ahead in front of Castrum VII will contain an Idol of Shatter. Castrum VII is the large guarded structure ahead. Before entering the area, circle around and search the walls and corners to loot a Griffon Figurine (Special) Artefact. Keep heading north of Castrium VII to reach the Outskirts Hazed Cave. Nearby is a "Warded Relic" which is an object warded by a spell that will require you to defeat surrounding enemies. This is the Shard you need.

Approach the warded relic and clear the following Combat encounter. During this encounter, you will be up against a greater foe, the Diver, one of the Greater Wraiths. Once you defeat all the wraiths in the area along with the Diver, you can now access the Warded Relic which is one of your 3 required Shards.
Clearing the surrounding wraiths will also activate a Side Quest: Protecting the Village.
You may encounter many more Side Quests as you explore the area. View the Side Quests page to see all available side quests in this Location and Region.
Enhanced Dash Shard #2
- Location: Outskirts Forest
Another beam will be on a very high point in the middle of the Outskirts Forest. This point is located just south of Castrum VII.

You will need to platform your way up, looking for areas you can jump and raise to reach the top. Make your up to this point. You will need to climb a nearby structure to the north and dash your way across in order to reach the shard. You may be able to come across a Padlock (Common) as you search the area.

Enhanced Dash Shards #3
- Location: Vast Sands
- Requirements: Complete Sealing Totem
Another beam will lead you toward the Vast Sands nearby a Sealing Totem in the region. Once you spot the Dash Shard, be ready for another Combat encounter once you approach it.

A number of Wraiths will appear when you approach the Shard. This will be followed by a larger Diver enemy that you will need to clear before you can interact with the Shard.
Upgrade your Air Dash at an anvil
You have collected enough shards to improve your Air Dash ability. Find an anvil to reforge the gauntlet.
Once you have a total of 3 Dash Shards, you can upgrade your Gauntlet from any Anvil. Travel to any anvil and use it. Select "Upgrade Gauntlet" and enhance your Air Dash to complete this part of the quest. Completing this part will allow you to continue progressing through The Path to Bastengar Main Quest.

Reforging the Gauntlet Quest Complete Description
You've managed to improve the powers of the gauntlet. They should help you overcome the obstacles in your path.
General Info
- Region: Caladrias: Forbidden Lands
- Location: Caladrias Desert Passage
- Starting NPC: Mapmaker (Arif)
- Previous: Reforging the Gauntlet
- Next: From Beliefs to Trust
Rewards
- Lost Temper
- Hurling Hammer
- Knuckledust
- The Great View
- Knight's Plate
Items
- Enhanced Raised Piece
Enemies
The Path to Bastengar Walkthrough Guide
The Path to Bastengar Atlas Fallen Description
You passed out. Arif woke you up and told you about a way to the Knights of Bastengar, but the access gate is buried. The unstable gauntlet cannot raise it. Nyaal sensed another piece of the gauntlet in some small ruins nearby that could help. Find it.
The Path to Bastengar Atlas Fallen Objectives
- Find a piece to stabilise the gauntlet
- Complete: Reforging the Gauntlet
- Meet Arif in Castrum VII
- Retrieve the piece in the ruins
- Complete: Reforging the Gauntlet Part 2: Unearth
- Speak to Arif
- Raise the village's gate
- Defeat the Marauder
- Unearth the Knights' Gate
The Path to Bastengar Walkthrough
Meet Arif in Castrum VII
Head into the Castrum VII. He will be up on a wooden platform. Interact with him to continue.

Retrieve the piece in the ruins
Arif told you that a piece of the gauntlet lies in the ruins of the old keep in the west. It might give you enough power to raise the buried gate. Search the ruins.
Your new marker will be toward the west. Head in that direction, but check the wagons and crevices and slow down once in a while to check for Items and Artefacts. There will be a Horse Figurine (Common) tucked away and a Flint Striker (Common) in the wagon stationed in an area before you reach a gorge. Glide through the sands west till you reach a deep gorge. There will be an Anvil you can raise nearby circled in the image below.

You will need to double jump and continue to dash across till you reach the other side then you will find yourself at the Shattered Keep. You can find Rod sitting on the edge to the left as you continue to the ruins. You can briefly interact with him for extra dialogue then continue in.
You will be met with a Diver enemy and a few other Enemies. Clear the wraiths in the area to continue. Continue to clear the area while heading deeper in through the Ground Floor. Make your way into the Shattered Keep Cellars.

Head deeper into the cellars and you'll eventually sense an Anvil nearby. Take some time to loot the area for a few Artefacts. There is a Colourful Fabric (Common) in a chest and an Instrument (Special) nearby. You can also choose to speak with the Researchers in the cellar.

When you are done with the cellar, head further in behind the Researchers to the Shattered Keep Cathedral. Check the sides for chests. One chest to the left will have an Essence Core. Head deeper into the Cathedral and you will find the piece you're looking for, an Enhanced Raise Piece.

The Path to Bastengar Quest Complete Description
You raised the Knights Statues. They seem to have been an old entrance to the stronghold of the Knights of Bastengar. You, Arif, and the villagers of Castrum VII journeyed through, to find what is left of the Knights.
Video
[video goes here]
The Path to Bastengar Trivia & Notes:
Trivia and notes go here
General Info
- Region: Caladrias: Forbidden Lands
- Location: Shattered Keep
- Starting NPC: The Voice
- Previous: The Path to Bastengar
- Next: The Path to Bastengar
Rewards
- Unearth
Items
- Unearth Shard x3
Enemies
Reforging the Gauntlet: Unearth Walkthrough Guide
Reforging the Gauntlet: Unearth Atlas Fallen Description
You found the artifact in the old cathedral, but it requires more shards. Find the shards in the keep and in the surroundings that enhance your raise ability. Remember to use Nyaal's senses to find the shards around you.
Reforging the Gauntlet: Unearth Atlas Fallen Objectives
- Find Unearth Shards (3)
- Upgrade your Raise at an anvil
Reforging the Gauntlet: Unearth Walkthrough
Find Unearth Shards (3)
You found the artifact in the old cathedral, but it requires more shards. Find the shards in the keep and in the surroundings that enhance your rais ability. Remember to use Nyaal's senses to find the shards around you.
This objective becomes available after progressing through The Path to Bastengar and after obtaining the Enhanced Raise Piece. You will be tasked to locate shards for the next upgrade after the Combat Interaction against a level 3 Tailguarder.

Clear and all the Enemies in the area to continue. Visit the Enemies page for Combat Tips against different wraiths. After your combat encounter, you will receive the Knuckledust, your final Weapon. You can then continue your search.
Players will need to continue to make use of Nyaal's senses to locate nearby beams and follow their light to lead them to the shards. While you are in the area, you can also explore the corners and crevices of the Shattered keep to obtain additional loot. Activate Nyaal's senses and look around for any nearby beams. The closest one should be on the higher levels of Shattered Keep. You will need to make your way to the second floor and then the roof of the keep. You be able to encounter and loot a few of the following items. Ancient Beads can be found in a chest on the Shattered Keep roof. Be careful, a few flying wraiths may appear in this area. Bloodbath the Lore Item can also be found along the second floor of the keep.

Unearth Shard #1
- Location: Shattered Keep Roof
Look around for the nearby beam on a tower that will be atop the Shattered Keep on the roofs. You may need to circle around a few towers in the area to find a way up. You may also encounter a few Artefacts on your way up like the Griffon Figurine (Rare) and the Animal Pelts (Common) which will be in a chest on the roof..

When you get to the top of the tower, there will be a Sealing Totem on top, sealing the shard. You will need to raise the first Sealing Totem and follow the beams within the time limit until you complete the sequence.

There will be seven totems to raise to complete the Sealing Totem sequence. It will lead you back to the tower where the shard is. Once you have completed the Sealing Totem, you can now obtain the Shattered Keep Unearth Shard. Once you have obtained the first Shard, activate Nyaal's Senses again to reveal your next location. The closest one should lead you south.

Unearth Shard #2
- Location: Shattered Keep Plateau
Heading south will eventually lead you to the Shattered Keep Plateau. There will be a few platforms you will be able to raise. You will be met with a few Wraiths in the area, including a Heaver. Clearing the Heaver will earn you an Essence Core. When the area is clear, you can redirect yourself to the Shard beam again with Nyaal's Senses. It will be on one of the higher towers.

Look for a low platform where you can start platforming upwards. You can start here, then use your Air dash abilities to cross and continue to make your way up toward the next beam.

As you cross through the ruins, remember to look back. You can pick up an Instrument (Rare) Artefact which can be found at the corner of one of the towers on a broken platform. Continue making your way over the towers and planks towards the hills and cliffs. Once you reach the cliffs, you can pick up the second shard. Follow the cliff edge to the end and you can also pick up an Old Memory Lore Item at the end of the cliff. You can now move on to the final beam.

One will lead you toward the Watchtower towards the east. You will be heading back towards the Outskirt areas, exiting the Shattered Keep. You might pass Theo's Altar, one of the Heavenly Shrines. On your way out of the Shattered Keep, you may be able to find a Colourful Fabric (Special) on one of the towers. When you are done, exit the Shattered Keep. Once you reach the outskirts continue to follow the beam.
Unearth Shard #3
- Location: Outskirt Cliff Forest (CastrumVII)
- Requirement: Complete Sealing Totem
Make your way across the outskirts and pass the outskirts bandit area till you reach the Outskirts Cliff Forest. There will be a Lore Item: Aftermath of the Battle. It will be under a tent in the area. Follow the beam up to the top of the cliff till you enter the Castrum VII Location. You will see the shard at the end where the flag is but it will be sealed.


There will be another Sealing Totem nearby for you to complete before you can collect the Shard. Raise the first Totem and it will lead you back down the slope. The 3rd one will be lower down the hill, continuing southwest. The fourth one will be up on the towers.You will need to climb them. It will be next to another Artefact, an Old Coin (Special). The next beam will lead you back toward the top of the cliff.

Finally, the 6th connected Sealing Totem will lead you back where the Shard is. Raise the final Sealing Totems then collect the third and last Unearth Shard.
Upgrade your Raise at an anvil
With all three required Shards, you can locate any Anvil and Upgrade your Gauntlet there. The closest one will be within Castrum VII. Drop down over the cliff and you can find an anvil there. Use your 3 Unearth Shards to upgrade your Enhanced Raise Piece. You will now be able to Uneath Greater Structures. This will once again, complete this section of the quest and you can continue your journey on The Path to Bastengar where you will be tasked to Return to Arif.
Reforging the Gauntlet: Unearth Quest Complete Description
You've managed to improve the powers of the gauntlet. They should help you overcome the obstacles in your path.
Video
[video goes here]
Reforging the Gauntlet: Unearth Trivia & Notes:
Trivia and notes go here
General Info
- Region: Caladrias: Forbidden Lands
- Location: Caladrias Desert Passage
- Starting NPC: Mapmaker (Arif)
- Previous: The Lost Anvils
- Next: From Beliefs to Trust
Rewards
- Lost Temper
- Hurling Hammer
- Knuckledust
- The Great View
- Knight's Plate
Items
- n/a
Enemies
The Path to Bastengar Walkthrough Guide
The Path to Bastengar Atlas Fallen Description
You passed out. Arif woke you up and told you about a way to the Knights of Bastengar, but the access gate is buried. The unstable gauntlet cannot raise it. Nyaal sensed another piece of the gauntlet in some small ruins nearby that could help. Find it.
The Path to Bastengar Atlas Fallen Objectives
- Find a piece to stabilise the gauntlet
- Complete: Reforging the Gauntlet
- Meet Arif in Castrum VII
- Retrieve the piece in the ruins
- Complete: Reforging the Gauntlet Part 2: Unearth
- Speak to Arif
- Raise the village's gate
- Defeat the Marauder
- Unearth the Knights' Gate
The Path to Bastengar Walkthrough
Speak to Arif
Arif will be in the same spot in Castrum VII. Speak to him to gain additional rewards for the quest and to activate the next objective.
Raise the village's gate
With your raise now upgraded, you can raise the village gate. Head over to the gate below and raise it. A cutscene will begin.
Defeat the Marauder
Your will need to defeat the Wraith. When the cutscene ends, there will be an anvil you can raise directly in front of you. Follow the marker on your compass to reach the Marauder. The Marauder is a Colossal Wraith. During this combat interaction, smaller Wraiths will appear in the fight as well. For combat tips against the Marauder visit the Marauder page. Clear the Marauder to continue.

Unearth the Knights' Gate
You defeated the massive Wraith at the gate, Raise the Kngiths' Statues fro the sand to be able to leave the desert and find the mysterious allies that Arif mentioned.
The game will lead you you raise the knight's Gate. However, once you go through the gate, you will not be able to return to this region. Make sure you finish your exploration and you are satisfied with your progress before moving on. To find all Landmarks and Activities in the area, follow the guides below.
The Path to Bastengar Quest Complete Description
You raised the Knights Statues. They seem to have been an old entrance to the stronghold of the Knights of Bastengar. You, Arif, and the villagers of Castrum VII journeyed through, to find what is left of the Knights.
Video
[video goes here]
The Path to Bastengar Trivia & Notes:
- Trivia and notes go here
Caladrias: Forbidden Lands Completion Checklist
Activities:
- Do all Side Quests and Errands in this Location
- Find All Caladrias Wildlife Habitats x4
- Find all Caladrias Treasure Map Locations x6
- Complete all Caladrias Sealing Totems x7
- Defeat theCaladrias Watchtower x1
Landmarks:
- Raise all Caladrias Anvils x12
- View all Caladrias Vantage Points x5
- Listen to All Caladrias Sand Echoes x3
Other:
- Do All Side Quests and Errands
- Collect all Lore Items in Caladrias x20
- Collect all Formulas in Caladrias x33
Bastengar's Underground Walkthrough

General Info
- Region: Bastengar's Underground
- Location: War Room
- Starting NPC: Khendra of Bastengar
- Previous: The Path to Bastengar
- Next: The City of the Sun
Rewards
All Quests in Region
Main Quests:
- From Beliefs to Trust
Side Quests:
- Valery's Trail
- The Forgotten Shrine
Errands:
NPCs
NPCs:
Merchants:
Bosses
- n/a
Items
Fusion Materials:
- View all Fusion Materials
Bastengar Formulas:
Bastengar Treasure Maps:
- TBA
Bastengar Lore Items:
- TBA
Quest Items:
- TBA
Enemies
Bastengar's Underground Walkthrough Guide
From Beliefs to Trust Atlas Fallen Description
You have found the Knight's Fortress, but Arif was taken away! See if you can talk to the leader of the Knights.
From Beliefs to Trust Atlas Fallen Objectives
- Enter Bastengar
- Talk to Khendra
- Find the Entrance to the Sunken City of Lothville
- (Optional) Check on Arif in his Cell
- Find a way to the Sunken Palace
- Look for Valery in the Sunken Palace
- Investigate the anvil
- Defeat the Spiker
- Collect the gauntlet Piece
- Find hints on Valery's wherabouts
- Investigate Valery's research camp
- Upgrade the Gauntlet
- Show proof to Khendra
- Free Arif from his cell
- Travel to Monsalar
From Beliefs to Trust Walkthrough
Enter Bastengar
Head through the doors to enter Bastengar. The Guards will tell you that you should talk to the commander. You can find her in the fortress, in the main hall.
Talk to Khendra
- Location: War Room
Together with Arif, you've reached the caves underneath Caladras. Bastengar, the fortress of the Knights, is located here, so is the Sunken City. However, upon arrival Arif was imprisoned by the Knights. Talk to Khendra, their leader, in the great hall.
Walk into Bastengar to the west. Follow the quest marker direction on your compass. There will be an Anvil nearby on your way there near the Cavern area just below the bridge to the left before you enter the Fortress. There is a lower level you can walk on. You are free to explore and speak to the Characters and Merchants --like the Knight Vendor --in the area or you can head straight into the great hall directly and into the War Room. If you choose to visit the Knight Vendor or the Village Smith, there will be a Padlock (Special) you can collect and the Graveyard will have a Griffon Figurine (Special) behind a tree.
When you want to proceed, Khendra will be at the round table. There will also be a few Lore Items in the same room: Leadership notes & Entry Three: A gruesome God. Pick up the notes before you exit the area. There will be a few other Lore Items in Bastengar spread throughout the Location. If you choose to track them down and collect them all, view all Lore Items in the area on the Lore Items page to keep track of which ones you are missing. When you are ready, interact with Khendra and complete the dialogue to continue.


Find the Entrance to the Sunken City of Lothville
- Location: Sunken City Lothville Upper Districts
- (Optional) Check on Arif in his Cell
- Optional Location: Prison of Bastengar
You arrived in Bastengar in search of answers but the only person who has them, Valery is missing. In order to gain Khendra's trust and learn more about the Gauntlet, you promised to find her sister. Go to the Sunken City to search for Valery
You have an optional secondary objective to speak with Arif. This will give you two quest makers on your compass. If you want to see Arif, head back outside where the long bridge is and before heading into the entrance of Bastengar, take the path to the right and climb the stairs and scaffolding. Go all the way up. There will be a few missing flights of stairs you will need to dash through. The stairs will lead you to the Prison of Bastengar. Take the rope bridge back across the other way facing east and it should lead you back to Arif's cell. At the end of the bridge, take the stairs on the left and you will see Arif.

If you want to activate an additional Errand, you can ask him about his situation and it will start: Good or... Edible Food. Additional guides for the errand can be found on the Errands page. Complete the errand to gain a Dark Silver Dye and Essence Dust.
To find the entrance to the Sunken City, follow the other quest marker on your compass. You will need to make your way down and you will eventually find yourself on the sands. Check under the broken, half-buried bridge arches to find a chest that will contain Animal Pelts (Rare). Continue to head north. It will be a downhill slope so you can sand slide all the way down till you reach the Knight Guards and their tents. There will be a Lore Item just next to their tents: Valery's research journal. There will also be an Old Coin (Special) nearby you can loot.

Next, you will be heading up the stairs behind the Knight Guard. You can speak to the guard for short dialogue. The guard will also give you a Piercing Parry Essence Stone. After speaking with the guard, take the stairs behind her. You can slide down till you reach a gap, then you will have to raise the platform ahead. Behind is a chest containing Golden Guardian. Use the newly raised platform to hop up. There will be some tributes you can loot at the corner with the pile of rocks and rubble. Drop down into the tunnel ahead. There will be a cell gate entrance below. Head in and use Raise at the end of it to create an entrance.


Sunken Passage
Find a way to the Sunken Palace
You found the Sunken City. You should delve deeper and see if you can get to the Sunken Palace
Use your newly formed entrance and you will arrive at the Sunken City of Lothville: Upper Districts. As you enter the city, there will be an Anvils available for you just to your left. You can raise and use it before you head deeper into the city in search of the Palace. You quest marker will lead you north. As you approach the stairs and structure, there will be a platform you can raise to the right of the path. If you take the west path, you should be able to see a Tailguarder in the distance. Approach the area to engage in Combat. Once you have cleared all the Wraiths in the area, you can continue following your quest marker. The marker will lead under an archway where you will need to take a long leap down towards the other side of the broken bridge. Make sure you are done with the Upper District area before you take the leap.


Look for Valery in the Sunken Palace
- Location: Royal Palace
Once you land on the bridge, your quest will update. If you make your way to the center opening where the balcony is in front of the large open windows, you will land at the Royal Palace. You will be able to see this open window from the Bridge. It will be to the left. The wooden planks will jut out where you can leap and dash. This will be your entry to the center of the Palace.

Investigate the anvil
After you step in, you should see the main ballroom area with an Anvil suspiciously positioned in the center of the room. Be ready for another Combat encounter against a Greater Wraith -- Spiker. Approach the center of the room to trigger the encounter.
Defeat the Spiker
Defeat the Spiker. For combat tips and movesets to use against the Spiker, view the Spiker page. Clear the Spiker along with all other Wraiths that appear in the area to continue. After clearing the Spiker, you will have three new objectives.
- Collect the gauntlet Piece
- Find hints on Valery's wherabouts
- Investigate Valery's research camp
Collect the gauntlet Piece
After you have cleared the area, you can now raise the center Anvil. The Anvil will have the Refined Dash Piece you need for the Gauntlet. Pick it up to trigger the next cutscene and begin the next dialogue sequence. Choose the main quest dialogue options to progress through the quest or choose any other response to learn more information before proceeding.
Find hints on Valery's wherabouts
You have found Valery's Camp. Take a look around to find something that could tell you more about her whereabouts or what she did here.
Begin following the quest marker to the left which will lead into an entrance. There will be a chest which will contain Valery's research journal which can also be obtained in the upper district. You will still need this item to complete the objective. You will also receive Deadeye's Attire, which is one of the rewards for this quest. This interaction will also trigger a side Quest: Valery's Trail
Investigate Valery's research camp
If want to continue to track the main quest, everything you need to investigate should be in this area. Return to the main arena where you raised the Anvil. There will be a circle marking on observable items. Observe a tool desk here then. head behind using any entrance and there will be another crafting table covered in data notes and research.

Finally, just nearby, there will be a glowing bench. Investigate enough of her research and you should be able to find enough Refined Dash Shards pieces for your Gauntlet upgrade. Collecting all the shards will complete the objective. Before you exit the area, check a few desks and there you can gain additional data and Bestiary information on certain wraiths.
Upgrade the Gauntlet
With the gauntlet piece you found and the shards Valery had gathered, you should upgrade the gauntlet to help you get out of the Sunken Palace and back to Khendra.
Head back to the Anvil in the center of the room. Interact with it and you will have the Refined Air Dash upgrade readily available. Upgrade the Gauntlet. With this upgrade, you can now dash 3 times.
Show proof to Khendra
- Location: War Room
You found valuable information on what happened to Valery. Return to Khendra and inform her about your findings.
Go back to the upper levels of the palace to look for a way back. Prepare for Combat. A Shellbasher will appear and you will need to clear the way to continue. View the Shellbasher page for Combat guides against the Shellbasher. Once it is cleared away, you can access the Sealing Totem just behind on the stand. Raise the first totem then turn around toward the door. The next one will be outside of the Palace. Follow the beam through the Lower Districts. You will need to raise the platform in front to reach the next totem. Be careful of the Tailguarder in the area. Use the top of the structures to cross to the other side. The fourth totem will lead you back to the palace. Use your new triple dash to quickly ascend to the opening of the palace.

Finally, you can use Raise on the gates below on the lower floor of the room. The beam will lead you to it. Exit the palace to enter the Depths. Nyaal will begin talking and another Side Quest will begin: The Forgotten Shrine. Follow the side quest page for steps on how to complete the side quest.
Continue making your way out. Clear the Heavenly Shrine ahead. This will be the only one in the Sunken City of Lothville. Explore the area. You should be able to come across a few Locations and Artefacts. A hut nearby labeled Old Smithy will contain a Replacement Limb (Special). Once you are satisfied with your progress in the Sunken City lower district, you can continue to make your way back by heading south. Go back to the broken bridge you landed on when you first arrived. Go all the way to the end and use your newly learned triple dash to get back across to the other side of the broken bridge.

Time your dashes to make sure you can make it all the way across. Once you reach the other wise, you will be back at the upper districts. There may be a number of wraiths just waiting for you on the other side. Continue southwest. Use the same Sunken Passage you made on your way to the Sunken City.

Head back toward Bastengar through the Cavern and back up on the bridge to Bastengar. Use the broken bridge as a ramp.

Head straight into the War Room where Khendra will still be. Interact with her to complete the objective. Complete the dialogue with Khendra to continue.
Free Arif from his cell
- Location: Prison of Bastengar
You told Khendara about what you learned in the Sunken City. While she ponders it, you area allowed to free Arif from his cell.
If you chose to complete the optional objective by visiting Arif before you made your way to the Sunken City, you can make your way back to the Prison. You can take the stairs on the left just after you get through the gates exiting the Bastengar Fortress. Take the stairs all the way up, dashing through the missing staircases. Once you reach the prisons, take the rope bridge to the east to reach Arif's cell. He will be in a cell after a few stairs on the left. Interact with him and complete the dialogue to trigger the next cutscene in the War Room.
Travel to Monsalar
- Location: Wildlands Gate
Enter the Wildlands and join the Knights in their battle against Thelods and the empire.
Follow the quest marker to make your way to the Wildlands Gate to reach Monsalar. Follow the main bridge outside the Bastengar Fortress entrance and head all the way east to reach the Wildlands gate. There will be a chest you can raise just right of the flight of stairs. When you are ready, head through the gates. You will find yourself in a tunnel passage. Completing this objective will complete the quest. To ensure you are satisfied with your progress, track all available activities, landmarks, and collectibles in the area by viewing the guide below before you progress to the next area and quest. Traveling to Monsalar will automatically transition to the next quest: The City of the Sun.
From Beliefs to Trust Quest Complete Description
The Knights are marching to fight Thelos, counting on your support.
Video
[video goes here]
From Beliefs to Trust Trivia & Notes:
- Trivia and notes go here
Navigation
Click on the links below to visit the page:
Monsalar Region Walkthrough

General Info
- Region: Monsalar: The Wildlands
- Location: The Wildlands
- Starting NPC: Khendra of Bastengar
- Previous: From Beliefs to Trust
- Next: A Bridge From the Past
Rewards
The City of the Sun Part 2
All Quests in Region
Main Quests:
Side Quests:
- Fallen from grace
- The Imprisoned Priest
Errands:
- TBA
NPCs
NPCs:
- Arif
- Graveller
- Head Huntress
- Odd Hunter
- Splinter
- High Priest
- Forewoman
- Beggar
- Thug
Merchants:
- Travelling Vendor
- Vendor
- Hunter Vendor
- Priest Estate Vendor
Items
Fusion Materials:
- View all Fusion Materials
Monsalar Formulas:
- Active Formula IX
- Active Formula X
- Active Formula XI
- Active Formula XII
- Active Formula XIII
- Active Formula XIV
- Active Formula XV
- Active Formula XVI
- Formula XIV
- Formula XV
- Formula XVI
- Formula XVII
- Formula XVIII
- Formula XIX
- Formula XX
- Formula XXI
- Formula XXII
- Formula XXIII
- Formula XXIV
- Formula XXV
Monsalar Treasure Maps:
- TBA
Lore Items:
- TBA
Quest Items:
- Rare apple
- Fire Oil
- Essence Barrel
Enemies
The City of the Sun Walkthrough Guide
The City of the Sun Atlas Fallen Description
The Knights are marching to fight Thelos, counting on your support.
The City of the Sun Atlas Fallen Objectives
- Meet with Khendra
- Reach Lithesta
- Inform the High Priest of the threat
- Look for oil in the estate's upper rooms
- Light the fires at Thelos' shrines
- Return to the High Priest
- Return to the gates of Lithesta
- Defeat the Soarer
- Ask the guard to open the gates
The City of the Sun Walkthrough
Meet with Khendra
As soon as you pass through the Wildlands Gate while completing From Beliefs to Trust, you will begin The City of the Sun and youw ill be tasked to Meet with Khendra. Follow the tunnel passage past the Wildlands gate all the way to the end and a short cutscene will begin.
Reach Lithesta
- Location: Monsalar: The Wildlands
- Rewards: Preachers Guard
Arif went ahead to scout Lithesta and gather information about the current situation there. Go to the city and find him there.
Exit the cave passage and take the stairs to the right. There will be an Anvil for you to raise. There will also be a statue with a chest. This will contain Incense (Special). Carry on to Lithesta. There will be a field of Quicksand Raise the platforms underneath to keep from sinking, Once you get past the quicksand, you will soon reach the Lithesta main road which you can follow. Once you see the stairs, check the area to the left with the barrels where the slope ends to loot a Lore Item: Surviving Knights?. There will also be another raisable Anvil nearby at the base of the archway. On the other side of the arch is a Spinning Toy (Common).
You can take the large staircase into the Roadside temple to explore some more, but you will need to continue following the main road past the Riverbed to the City's Front Garden to reach Lithesda. Take the long staircase in front of the Old Tithe Road to enter the City Plaza in front of Lithesda's main entrance.

There will be a WARNING Lore item behind the structure holding the flag at the top of the stairs. When you're ready to progress, approach the large doors and speak to the City Guard.

Inform the High Priest of the threat
- Location: Priest's Estate
The city gate has been barred due to speculation of an imminent threat. The guard at the gate said the High Priest might be able to resolve this and unlock access to the city again. Find the High Priest at the estate.
Start heading southeast. Another Anvil will be in the ground in the open fields next to the stone path. There will be a Spiker near the City's Front Garden. Approach it to begin a Combat interaction. View the Spiker page for Combat tips. Continue Southeast past the Riverbed till you reach the Outer Reach's Ridge. Continue past the field and flowers till you reach the slope leading into the Priest's Estate.

Head up the stairs into the Priest's Estate. Take The Black Alms Lore Item on the bench to the left. You can explore the estate. To complete the objective, speak to the High Priest at the center altar.

Look for oil in the estate's upper rooms
Make your way through the estate's upper rooms and there will be a small pile of containers. Interact with it to take a container of oil. There will also be a chest in the room just next to it. Loot it for a Lore Item: Fallen from grace. This will begin the Side Quest: The Imprisoned Priest. Before you leave the area, search the location- there will be a Replacement Limb (Common) you can loot at the ledges.
Light the fires at Thelos' shrines
- Location: Monsalar: The Wildlands
The High Priest ordered you to get oil from the storeroom and light three shrines to distract the wraiths from Lithesta. The shrines are distributed around the Wildlands. According to her, Lithesta's crisis would surely be resolved this way..
You will have three new objective markers to follow around the Wildlands. Look for Thelo's Shrines and light all three. Follow the directions of the quest marker on your compass to locate each one.

One will be near the City's Front Garden, another at the Outer Reach's Ridge and another will take you through the Northern Ridge where the Shrine will be at Sundial Road. The Shrine Locations will also be marked on your map with the yellow main quest marker.

Return to the High Priest
- Location: Priest's Estate
You lit the fires at the three Shrines. Return to the High Priest to report your success.
Once you've lit all the Shrines, you can return to the Priest's Estate and speak to the High Priest again to complete this objective. You will also be rewarded with the Preacher's Guard.
Return to the gates of Lithesta
- Location: City's Front Garden
After doing the high priest's request, the fires did not work as intended and now Lithesda is under attack! The priest has given you armour that holds great power for the upcoming fight.
Prepare for Combat. Return to the City Plaza where you met the City Guard and you will be met with a number of Wraiths and a Soarer, aColossal Wraith.
Defeat the Soarer
Defeat the Soarer. Combat information: When the Soarer enters its frenzied phase it is not only much faster, more aggressive and deals more damage, but is also extremely vulnerable to incoming hits as its defenses are lowered. View the Soarer page for additional Combat tips.
Ask the guard to open the gates
The wraith in front of the gate has been defeated. Talk to the guard to have the gate opened again, now that the entrance is safe once more.
Speak to the City Guard standing in front of the main entrance. This will begin the next dialogue and will complete the first part of the quest.
The City of the Sun Quest Complete Description
tba
Video
[video goes here]
The City of the Sun Trivia & Notes:
Trivia and notes go here
General Info
- Region: Monsalar: The Wildlands
- Location: Hunter's Camp
- Starting NPC: The Voice
- Previous: The City of the Sun
- Next: __next__
Rewards
- Unearth
NPCs
NPCs:
- Odd Hunter
- Head Huntress
- Forewoman
Merchants:
- Hunter Merchant
Items
- Items
Enemies
A Bridge from the Past Walkthrough Guide
A Bridge from the Past Atlas Fallen Description
The path up to the Watchtower collapsed. A mysterious artefact could create a path, but your gauntlet needs to be improved to interact with it. The miner mentioned an "odd hunter" from the hunter camp up the road to Lithesta. Maybe he could be of help?
A Bridge from the Past Atlas Fallen Objectives
- Ask about the hunter who knows the area
- Talk to the odd hunter
- Find the Reveal Shards (3)
- Upgrade your Unearth power
A Bridge from the Past Walkthrough
Ask about the hunter who knows the area
- Location: Hunter's Camp
Once this quest ie activated, you will have a new quest marker on your compas to follow. Jump down northwest from the artefact you found. There will be platform you can Raise that will create a long staircase for later. When you're ready, head back to the main road and return the other way to reach the Hunter's Camp you passed on the way to the Mining Village. The camp will also be marked on your map. Follow the road till you reach the Wildland Wastes and the Hunter's Camp should follow.
img
Once you arrive, loot the Griffon Figuring (Special) next to one of the tents and a Instrument (Common) nearby if you haven't already. There a number of other NPCs and a Merchant in the area that are related to other Errands if you want to participate for extra rewards. To fulfil the objective, speak ot the Head Huntress. She will have a yellow main quest marker above her head. After the dialogue, you can interact with her again for an additional Side Quest.
Talk to the odd hunter
- Location: Southern Wastes
The hunters told you about the mysterious man who has helped the miners before. He does not live in their camp, but the lead huntress pointed you towards his makeshift encampment nearby. Find out if the man can help you in any way.
After speaking to the Head Huntress, you will have a new location marker on your map which will also appear on the compass. Locate his encampment at the marked location. There will be two Lore Items around the Wildland Forests: A Wanderer's Destiny: First Part & A Wanderer's Destiny: Second Part. Once you reach the location, you will find the Odd Hunter and his tent. There will be another Lore Item near him on a rock: Orders?, and another behind the Odd Hunter in his tent called Unseen reports. Speak to the Odd Hunter to continue. He will give you the Refined Raise Piece.

Find the Reveal Shards (3)
- Location: Monsalar: The Wildlands
You received a part of the gauntlet, but you still need the shards to harness its power. Coollect the shards around the Wildlands. Remember to use Nyaal's senses to see shards around you.

While searching for the shards, you will need to make use of Nyaal's Senses again. The closest one will be towards the southwest. Jump down and there will be multiple interactable pits you can use Raise on just below where the odd Hunter is. One of them will contain a shard.
Reveal Shard #2
- Location: Western Ridge

The next shard will be to the Northwest. There will a lot of open sand in between, and you can go ahead and sand slide across. You may encounter a few Wraiths on your way. The marker will lead you to the Western Ridge. There will also be raisable chest contain Ancient Beads (Common). You will need to platform your way up the towers.
28:48
Once you reach the first tower, you can pick up the Wraiths and Humans Lore Item. From this tower dash toward the next one to the south. You will see that the next shard is sealed, but there is a Sealing Totem directly by it. Raise it then follow the sequence. The Totems will be quite a distance apart this time. By the third totem, you can also pick up a Replacement Limb (Rare). When you are ready, activate the first Sealing Totem then follow the beams to raise the totems in sequence. It will lead back to the first totem. Once the Sealing Totems are raised, you can collect the shard.
Reveal Shard #3
- Location: Southern Crater


From the second shard location, activate Nyaal's Senses to reveal the beam direction and it should lead you south. Once you arrive, you will need to drop down into the creator, but there will be a number of large Wraiths to clear, since the shard is protected as a warded relic. Clear the Spiker and all appearing Wraiths in the area. Once you have cleared the Combat interaction, the shard will be free for the taking. You will have all the shards you need for the upgrade. Any more collected shards will be an Excess Shard that will get converted into an Essence Core.
Upgrade your Unearth power
- Location: Monsalar; The Wildlands
You sound enough shards to improve the gauntlet. Find an anvil to do it and increase your raise capabilities!
Locate or Navigate to any Anvil so you can Upgrade your Gauntlet. Upgrade your Reveal and you'll be able to reveal Forgotten Paths. This will also complete the quest and you can proceed where you left off in The City of the Sun.
A Bridge from the Past Quest Complete Description
You improved the raise power of your gauntlet and can now cross the gap that leads to the Watchtower!
Video
[video goes here]
A Bridge from the Past Trivia & Notes:
Trivia and notes go here
Navigation
Click on the links below to visit the page:
The Black Alms Region Walkthrough

General Info
- Region: Monsalar
- Location: Citadel
- Starting NPC: The Voice
- Previous: The Power to Reach Thelos
- Next: A Source in the Swamp
Rewards
- n/a
All Quests in Region
Main Quests:
Side Quests:
- TBA
Errands:
- TBA
NPCs
NPCs:
- TBA
Merchants:
- TBA
Bosses
- n/a
Items
Fusion Materials:
- TBA
Formulas:
- TBA
Treasure Maps:
- TBA
Lore Items:
- TBA
Quest Items:
- TBA
Enemies
The Battle of Gods Walkthrough Guide
The Battle of Gods Atlas Fallen Description
tba
The Battle of Gods Atlas Fallen Objectives
- Find your allies in the black Alms
The Battle of Gods Walkthrough
tba
The Battle of Gods Quest Complete Description
tba
Video
[video goes here]
The Battle of Gods Trivia & Notes:
Trivia and notes go here
z